Frequently Asked Questions
Getting Started
How do I make an account?
To learn more about creating an account, vist our Getting started (opens in a new tab) page.
Help! I'm locked out of my account.
If you believe you have the correct password and you are not able to access your account, first click the eye icon to ensure you are typing in your password accurately. If you are still locked out, select forgot password to create a new one. You will be asked to enter your email to be sent a password reset link. You'll be able to create a new password to log in to your account.
Creating and Scoring Assessments
How do I create an Assessment?
If you have permission to Create Assessments, you will see a "Create Assessment" button appear on the Assessments page. Click the button to begin.
- Choose your scorecard. This will be the the scoring criteria used to assess your Division, Community, or Lot.
- Select the location you will be assessing by clicking the "+".
- Optionally, you can set your visit start date, end date, and the planned delivery date of the assessment. This is an optional step if you would like to provide additonal information to when photos were taken or the date you expect your assessment to be complete.
- Choose who has access to your assignment.
- The Assignee is whichever user will be responsible for the results of the assessment. Assignees will not be able to view the scores until the assessment is finalized.
- Editors are users who can view the assessment while in Draft and have the ability to edit.
- Viewers are users who will be able to see the results of the assessment once the status is set to final. General Visibility: This describes who in Perform can see the finalized assessment. The default general visibility is Normal meaning anyone who has access to the location being assessed (i.e. the Division, Community, or Lot) will have the ability to view the assessment. Changing the visibility to Global would allow everyone in your organization to view the assessment. Finally, changing the visibility to Hidden would hide the assessment from everyone except those specified above.
Changing Assessment Information
If you are the author or one of the editors of an assessment, you will have the ability to change certain information. You will be able to edit information entered upon creating the assessment. If you have accidentally selected the wrong location when creating an assessment, you have the ability to move the assessment. However, if any photos entered via the Photos tab will be lost and will need to be added to the newly moved assessment.
Scoring an Assessment
Depending on your company's scorecard, you will either be scoring on a numerical scale (e.g. 0-4, 1-3 stars) or pass/fail. To begin scoring, click the pencil icon next to the checklist you'd like to start with. Select a score and begin adding your notes and photos. You can take in app photos by giving permission to access your camera. Add captions to the images to provide additional information on the photo. If you are not seeing the option to add notes, click "show more" to view the text and photo fields. Continuing down the checklist, you have the option to jump to the next by clicking the down arrow. To view the previous checklist, click the up arrow. If you want to jump to a different checklist under a different category, click the three horizontal lines to access an overview of the categories and checklists. Clicking will take you directly to the chcecklist, where you can begin scoring checkpoints.
Scoring an Assessment with instances
Adding an "instance" is the same as adding a "sub-score." If you are assessing a Lot you may have multiple "instances" of a checkpoint item (i.e. paint touch-ups). By clicking the "add instance" drop-down menu, you will be able to select a room that contains an instance of the checkpoint. If you are assessing a Community, you will be able to select a Lot that contains an instance of the checkpoint.
Uploading and Tagging Photos
Via the photos tab, you can upload photos in bulk. You have the option to tag photos before or after uploading to add information such as location, rating (quality opportunity or best practice), and system (category). This will help when going to score your Assessment.
Finalizing an Assessment
When finished scoring your assessment, change the status from Draft to Final. You will notice a box to check if you want to Send a Receipt to your choice of users to notify them of the assessment's status change.
Why can't I find an Assessment?
By default, the system will only show assessments that you created or which have you assigned as a "Viewer" or "Editor". If you want to see all the assessments you have access to view, you'll need to change the sidebar filter from "My Assessments" to "All Assessments".
Additionally, assessments will be filtered by your current location which is set in the upper-right-hand corner of the page. Resetting this location will show you a more full list also.
If you're still not finding it, consider the following:
- The location of an Assessment typically controls it's general visibility. If you are not assigned access to the same location as the assessment, you won't typically see it.
- Assessments can't be seen by outside companies, unless they were created by or for that company, even if that company is given location access to the same location as the assessment. This is to protect your data.
Creating Tasks
How do I create tasks from an Assessment?
There are multiple ways to create tasks from the results of an Assessment. With the Assessment results open:
- Use the triple-dot menu next to a score or a highlight and select "Create Task", to create tasks one at a time.
- For Scores, you can create multiple tasks at once. Select scores by clicking on the colored icon (which is also a checkbox); once one or more scores are selected a menu will appear at the top of the page prompting you to "Create Tasks" (or "Print Items").
How do I print Tasks?
Users can navigate to the Tasks tab to view all tasks that have been created. Each item on a Task list can be selected by clicking on the icon on it's left, or by clicking "Select All," which will reveal sharing options at the top of the screen. If all you need is a PDF, select items and use the "Share Links" button, you'll then be able to "View PDF".
Why don't I see tasks when I open the Tasks page?
By default, the system will only show tasks that you created or that are assigned to you. If you want to see all the tasks you have access to view, you'll need to change the sidebar filter from "My Tasks" to "All Tasks"
Additionally, tasks will be filtered by your current location which is set in the upper-right-hand corner of the page. Resetting this location will show you a more full list also.
PERFORM Mobile
Where can I download the PERFORM mobile app?
PERFORM's mobile app can be found in the App Store on Apple devices and Google Play Store on Android devices. Simply search and download "PERFORM with IBACOS."
Note: As of now, you cannot create an account on the mobile app. To learn more about creating an account, vist our Getting started (opens in a new tab) page.
What are the little icons next to my Assessments?
There are 6 icons that can appear next to an Assessment to indicate it's offline status. Colored icons (green or blue) indicate an Assessment is saved to your device (it's available offline):
- Saved to Device (View Only)
- Locked to Device (for Edit)
- New Version Available
- Has Unsynced Data
Grey icons indicate that it's in the cloud (it's not available offline yet):
- Available for Download
- Locked in the Cloud (Available for View-Only download)
On the web, you'll see one of two icons:
- Normal Assessment
- Locked Assessment: This assessment is locked to a device, and it can't be edited online
How do I sync an Assessment?
Syncing assessments is a necessity when using the mobile app. PERFORM's mobile application gives users the ability to create, score, and finalize assessments completely offline, meaning no WiFi or cellular service is necessary. Because of this feature, assessments created via the mobile app will need to be synced.
To do so, a user with access to WiFi and/or cellular service will need to use the "Sync Now" button located at the top of the screen. If the status of the assessment is "Review" or "Final," the user will be asked if they would like to send an email receipt. The recipients will be auto-populated with any user listed as an assignee, editor, or viewer, with the option to add additonal users. Receipts will include a link to the assessment as well as a notice of the status change from "Draft" to "Review" or "Final".
I got a message saying my Assessment failed to sync, what now?
If you've received a notice that your sync has failed, first ensure you have a good WiFi connection and try again.
If you are still unable to sync successfully, do not log out or delete the app. Please reach out to support@ibacos.com for steps on retrieving your assessment data.
My Assessment is "Locked" and it can't be edited
When you edit an Assessment through the mobile app (and not the web), it locks to your device to prevent other users from editing it simultaneously while you're offline. For as long as it's locked to your device, no one else can edit it online; you'll know it's locked when you see the lock icon next to the title of the Assessment.
To unlock it, you'll need to:
- Find it on the device where you were editing it; you should see the green locked symbol next to it ().
- Tap the triple-dot menu next to that Assessment for unlock options.
Note: When you change an Assessment to "Final" state, it will prompt you to unlock it. This is probably why some people never notice the lock symbol. You usually only need to manually "unlock" an assessment when you need multiple people to work on it.
What does "Clear Data" mean?
When you "Clear Data" from your device, it doesn't delete it on the server. It's just removing it from your device to free up storage. The only way to delete the Assessment and it's data is to open it to the Info page, tap "Edit", and then "Delete"; and even then it will ask you if you are sure.
Why are my offline Assessments limited?
While PERFORM users are able to store assessments they are no longer working on, it is not recommended that users keep no more than 20 Assessments downloaded at a time. If you've received this limit message, you can either Clear Data from assessments one by one or click the "Manage Data" menu to Clear Local Downloads.
Note: These assessments are not being deleted. They are stored in the Cloud and are available to download at any time.
Library
How do I print in bulk? (Checklists or other content)
Each item in the Library list can be selected by clicking on the icon on it's left, which will reveal Print options in the upper right-hand corner of the screen. Try it here:
These buttons will take you to a special page with the documents formatted for print. "Print #" will print just the documents selected, while "Print All" will print all the documents currently visible (i.e. if you filter the list, "Print All" will still only print the filtered list).
What do the symbols mean next to the Library content?
- Checklist
- Step-by-Step
- Video
- Files
- Quiz (Course-only)
- Assessment (Course-only)
Scores
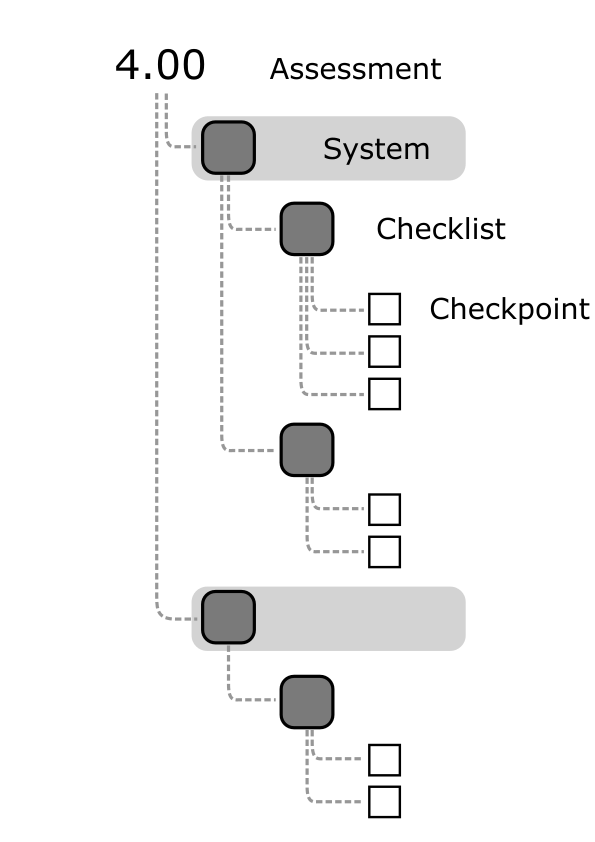
Why did I get the score I did?
The first key to understanding your score is to understand how calculations are done. Typically, score observations are averaged in each Checklist, then those Checklist values are averaged to get a System score, and then System scores are averaged for your Overall score. Consider the following diagram:
When I average the score myself, it doesn't give the same result. Why?
This can happen for a couple reasons:
1. The PERFORM platform makes all it's calculations with unrounded numbers, but it displays rounded versions of those numbers on the app. If you recalculate with the display numbers, you might be using already rounded data and you won't get the same result. Let's take a simple example:
| Category | Rounded Score | Calculated Score |
|---|---|---|
| Job Site Safety | 95% | 94.5% |
| Site | 99% | 98.5% |
| Foundations | 91% | 91.5% |
| Framing | 90% | 89.5% |
| Drainage Plane | 87% | 86.6666% |
| Average of Rounded Numbers | 93% (92.6%) | - |
| Actual Calculated Score | 92% | 92.13332% |
In this case, someone doing the calculations using rounded scores is getting a 1% better score than what is calculated when you recalculate everything from scratch. While the lower value is correct in this case, the difference does indicate that a small change in scores could easily bump this up.
Note: The system treats "100%" differently than other scores: it will never round up to 100% unless the value is actually 100%. So for example: a 98.5 would display as a 99%, but a 99.5 would not display as 100%.
2. Some scorecards use weighting to make certain parts of the scorecard count more. Your calculations will need to account for weighting to be accurate. You can see the weights on your Assessment under each section. Here's that same example with weights:
| Category | Calculated Score | Weight |
|---|---|---|
| Job Site Safety | 94.5% | 3 |
| Site | 98.5% | 4 |
| Foundations | 91.5% | 5 |
| Framing | 89.5% | 6 |
| Drainage Plane | 86.6666% | 7 |
In this example, if you did a straight average of the numbers, you'd get a 92% (92.13332%), but with weighting, it's a 91% (91.14665%). This makes sense that's it's lower, because the scores with more weight were generally lower. You can calculate this yourself by getting a sum of each score multiplied by its weight, divided by the total of the weights ( (94.5*3 + 98.5*4 + 91.5*5 + 89.5*6 + 86.6666*7) / (3+4+5+6+7) ). In excel, this would be SUMPRODUCT(ScoresColumn, WeightsColumn)/SUM(WeightsColumn).